Introduction
The Cinematic Movie Still Prompt is designed to transform an ordinary reference photograph into a dramatic, high-end cinematic scene that looks like a frame captured directly from a big-budget movie. The concept combines a heroic pose, sunset lighting, urban architecture, realistic clothing, atmospheric depth, and professional filmmaking aesthetics.
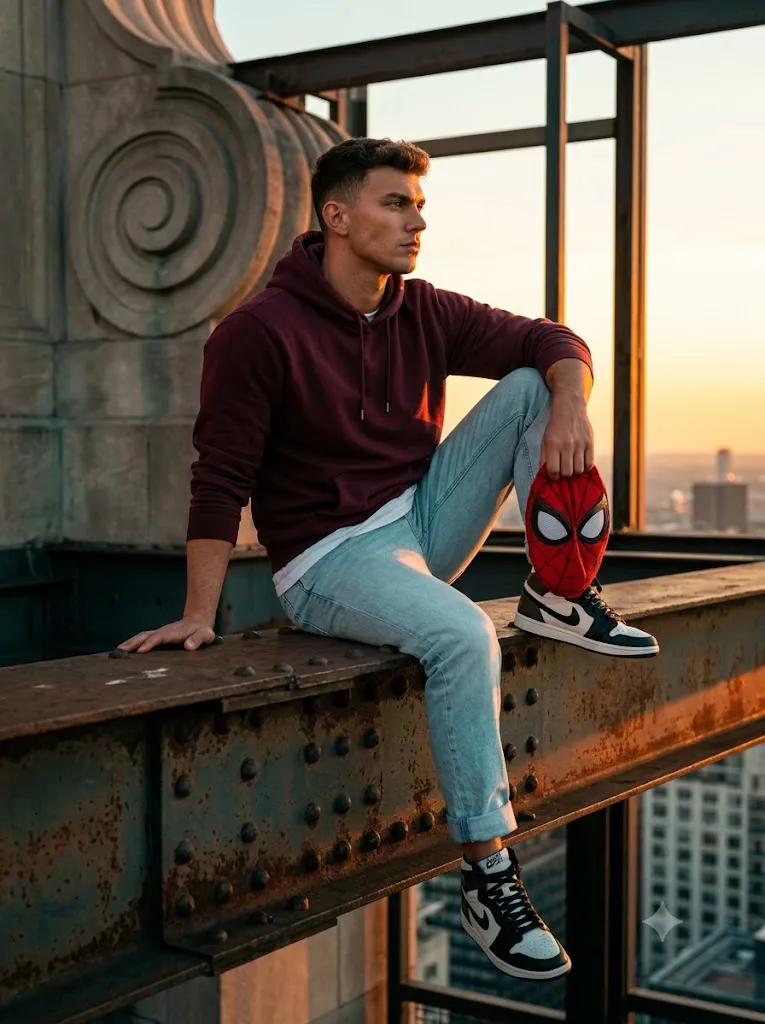
The main character is positioned high above the city on a rusty, riveted steel I-beam. The subject has a contemplative and heroic expression while looking toward the sunset. This elevated composition immediately creates a feeling of scale, isolation, confidence, and cinematic storytelling.
The clothing is intentionally casual yet visually distinctive. A loose maroon-burgundy hoodie with pushed-up sleeves is paired with a white undershirt, light-wash blue straight-leg jeans, and black-and-white high-top skate sneakers. The red-black superhero mask with white mesh eye lenses becomes an important storytelling prop without covering the subject's face.
The background combines ornate carved stone architecture, dark steel beams, a glowing orange-yellow sunset, and a distant hazy city skyline. This mixture of old architectural details and industrial metal structures gives the image a dramatic movie-world atmosphere.
Lighting is another major component. Warm amber light illuminates one side of the subject while cooler teal shadows define the opposite side. This orange-and-teal cinematic treatment creates depth and gives the portrait a polished Hollywood-inspired appearance.
When using a reference photograph, the prompt should prioritize the subject's identity. The reference image should guide the facial and body appearance while the AI transforms the environment, clothing, pose, and cinematic atmosphere.
"Cinematic Movie Still Prompt"
Cinematic movie still, medium full shot, subject (use reference photo for face/body) sitting on a rusty riveted steel I-beam high in the air. Contemplative heroic expression, looking off-camera right toward sunset. Right leg extended, left knee raised, right hand flat on beam, left hand loosely holding a red-black superhero mask with white mesh eye lenses. Outfit: Loose maroon burgundy hoodie (sleeves pushed up), white undershirt peeking at waist, light-wash blue straight-leg jeans (cuffed), black-white high-top skate sneakers with white laces. Lighting: Dramatic golden-hour, warm amber key light on right side, cool teal shadows on left, classic orange-teal Hollywood grading. Background: Ornate carved stone architecture (right), dark steel beams framing (left), glowing orange-yellow sunset sky, hazy silhouetted city skyline in distance (lower left). Detail/Focus: Sharp foreground rust/metal texture on I-beam, cinematic depth-of-field blur on distant city/sky. Technical: Ultra HD 8K, shot on ARRI Alexa, 35mm lens, f/4.0, subtle film grain, lifted matte blacks, high contrast, photorealistic fabric detail, masterpiece quality.
How To Use Photo Editing?
Creating this cinematic movie still is easiest when the editing process is performed in several stages.
Step 1: Choose a Reference Photograph
Begin with a clear, high-resolution photograph of the person you want to feature. A reference image with a visible face and recognizable body proportions will generally produce better results. Avoid heavily blurred images or photographs where the subject is partially hidden.
Step 2: Upload the Reference
Open an AI image editor or image-generation platform that supports reference images. Upload your photograph and select it as the primary reference.
Use a clear instruction such as:
“Use the reference image for the subject's facial identity and body appearance. Preserve recognizable facial characteristics and natural proportions while changing the environment, clothing, pose, and cinematic styling.” This helps separate the identity reference from the creative transformation.
Step 3: Add the Cinematic Prompt
Paste the complete Cinematic Movie Still Prompt into the prompt field. Make sure the prompt includes the steel I-beam, sunset, city skyline, clothing, superhero mask, architecture, lighting, camera style, lens, depth of field, and film-grain requirements.
Step 4: Generate Several Variations
Generate multiple versions instead of relying on the first result. Compare the images for facial consistency, natural pose, realistic hands, correct clothing, and convincing lighting. Select the version with the strongest overall composition.
Tools You Can Use For Prompt Copy and Create Photo
Several categories of tools can help you create this type of cinematic image.
1. AI Image Generators
Text-to-image platforms are useful for generating cinematic environments from detailed prompts. They can interpret concepts such as sunset lighting, architecture, steel structures, clothing, atmospheric haze, and cinematic depth of field. If you are using a real person's photograph, choose a tool with reference-image capabilities.
2. AI Photo Editors
AI photo editors are particularly useful when you already have a reference photograph and want to transform the surrounding environment. They can help modify clothing, background, lighting, atmosphere, and composition while retaining the original photograph as a visual guide.
3. Graphic Design Software
After generating the image, graphic-design software can be used for finishing touches. You can crop the image, add subtle typography, adjust framing, or prepare different versions for social media.
4. Image Enhancement Tools
Upscaling and enhancement tools can help improve the final resolution and sharpen important details. Pay special attention to the subject's face, clothing texture, steel beam, architectural surfaces, and distant skyline.
How To Edit Photo?
Once the first AI-generated version is ready, carefully refine the image.
Step 1: Check the Face
The face should remain natural and recognizable compared with the reference photograph. Inspect the eyes, eyebrows, nose, lips, jawline, skin texture, and hairstyle. Avoid excessive AI beautification or artificial skin smoothing. If the facial identity changes too much, regenerate the image with stronger reference-image instructions.
Step 2: Check the Pose
The subject should appear naturally seated on the steel I-beam. The right leg should extend naturally, while the left knee remains raised. The right hand should make believable contact with the beam, and the left hand should naturally hold the red-black mask. Pay particular attention to the hands and fingers because these areas can sometimes contain AI-generated artifacts.
Step 3: Refine the Clothing
The maroon-burgundy hoodie should have realistic fabric folds and natural shadows. The sleeves should appear pushed upward without looking distorted. The white undershirt should subtly appear near the waist. Light-wash blue jeans should maintain realistic denim texture, while the black-and-white sneakers should have accurate laces and proportions.
Step 4: Improve the Steel Beam
The rusty I-beam is an important foreground element. It should contain visible rivets, scratches, weathering, oxidation, and realistic metallic texture. Adding sharp foreground detail helps establish depth and makes the scene feel physically believable.
Step 5: Adjust the Lighting
The sunset should provide a warm amber key light from the right side of the subject. The left side can contain cooler teal shadows. Maintain a smooth transition between the warm highlights and cool shadows. Avoid making the color grading too extreme. The lighting should still look like realistic cinematic photography.
Step 6: Enhance the Background
The carved stone architecture should remain detailed but slightly softer than the subject. Dark steel beams can frame the composition on the left, while the glowing sunset occupies the background. The distant city skyline should be hazy and slightly blurred, creating atmospheric perspective.
Step 7: Add Depth of Field
A cinematic depth-of-field effect can make the subject stand out from the background.The foreground rust and metal texture should remain sharp, while distant buildings and parts of the sunset become softer.
Step 8: Apply Final Cinematic Grade
For the finishing stage, use subtle contrast, lifted matte blacks, controlled highlights, warm sunset tones, cool shadows, and a small amount of film grain. Avoid excessive grain or over-sharpening. The final image should retain realistic skin and fabric textures. For social media, a vertical 4:5 composition works well for posts, while 9:16 is suitable for Stories and Reels.
Conclusion
The Cinematic Movie Still Prompt is an excellent concept for creating a dramatic heroic portrait that feels like a frame from a professional movie. The combination of a high steel structure, sunset skyline, vintage architecture, casual streetwear, superhero-inspired prop, and cinematic color grading creates a strong storytelling atmosphere.
The key to achieving a convincing result is balance. The subject should remain the visual focus while the background provides scale and atmosphere. Facial identity, realistic body proportions, natural hands, accurate clothing textures, and believable lighting are especially important.
For the best results, begin with a high-quality reference image, provide detailed instructions, generate multiple variations, and carefully inspect the final composition. Afterward, refine the lighting, colors, depth of field, sharpness, and cinematic grain.
With a carefully structured prompt and thoughtful editing process, an ordinary reference photograph can become a powerful Hollywood-style cinematic movie still with a dramatic sunset atmosphere and professional visual storytelling.